Managing differential backup with Proxmox
When working with Proxmox the first question should be how are you going to manage backups. It is clear that the responsibility of making machine internal backups is on the owner of the VM. But, what happens if the Proxmox administrator (me, in this case) completely loses the server as a result of some kind of disk failure? The answer is simple: do a backup!
Backup schedule
Proxmox offers an out-of-box solution for performing the task. However, the way it is by default is far from being perfect.
Basically, if using the solution as-is you will end up with a bunch of files where each of them will have approx. the size of the VM's disk.
However, there is a solution which offers differential backups. What are differential backups?
Long story short: on day 1 you make a full backup of your VM (b1), on day 2, you make another full backup of your VM (b2).
After that, you make a binary diff between b2 and b1 and store only this information (d1).
At any point of time if you have b1 and d1 you will be able to restore b2. However, you will need much less storage space compared to storing b1 and b2.
The entire solution is built as Proxmox plugin and integrates perfectly into the GUI. Thanks, ayufan for this.
Backup configuration
After installing the plugin I spent some time trying to figure out the backup structure.
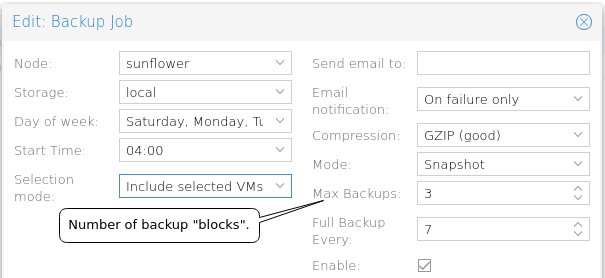 To illustrate the idea I made a screenshot of the backup view. If you configure it this way you will get backups for 24 days,
3 full backups plus 21 (7 days for each full backup) differential backups. Backups older than this will be automatically deleted.
The thing is, the differential backup will need only a fraction of storage space compared to full backup.
To illustrate the idea I made a screenshot of the backup view. If you configure it this way you will get backups for 24 days,
3 full backups plus 21 (7 days for each full backup) differential backups. Backups older than this will be automatically deleted.
The thing is, the differential backup will need only a fraction of storage space compared to full backup.
Let's see the numbers. In my case for a single VM a full backup needs about 4,3G, so, if I want to store backups for 24 days you will need approx. 103,2G.
At the same time, a differential backup needs only about 1,5G, of course this amount depends on how much "movement" a VM gets during a day,
but here I take the largest value (normally it will go down to 500-600M). So, the full estimation would be 4,3Gx3 + 1,5Gx21 = 44,4G. 103,2G vs 44,4G, not bad at all.
Restoring the backup
OK, so, you have your daily differential backup and obviously, you have it stored somewhere outside the machine itself. One day, I will make a post regarding this matter too. Now, if bad things happen and you still with your host system available the restore may be done with a couple of clicks. But what happens if your host system is no longer available? Well, you will need to restore the backup somewhere outside of your host machine. To find a way to do this I had to investigate a little since it's not obvious at all.
Case: Restoring a full backup
If you need to restore a full backup file, the one with vma.gz extension the process is quite simple.
The file itself is gzipped vma container. You may read more about vma format here.
The problem is, if you are restoring it outside the host, you will need to install the vma tool, which comes bundled with Proxmox itself.
Installing vma alone is not easy, however people from Proxmox forum found a trick,
which consists basically of installing all needed dependencies and then copying vma executable.
I surely need to prepare a docker image with this tool to avoid this installation process, meanwhile:
# echo "deb http://download.proxmox.com/debian stretch pve" >> /etc/apt/sources.list
# wget http://download.proxmox.com/debian/proxmox-ve-release-5.x.gpg -O /etc/apt/trusted.gpg.d/proxmox-ve-release-5.x.gpg
# apt-get update

/* At this point you will probably need to check which package contains the required file */
# apt-get download pve-qemu-kvm

# dpkg --fsys-tarfile /tmp/pve-qemu-kvm_2.12.1-1_amd64.deb | tar xOf - ./usr/bin/vma > /usr/local/bin/vma

# chmod 755 /usr/local/bin/vma
At this point, if you try to execute vma tool the system will complain about some shared libraries. Let's install those dependencies:
# apt-get install libglib2.0-0 libiscsi7 librbd1 libaio1 lzop glusterfs-common libjemalloc1
After this point you should be able to restore a full backup file. Let's do it.
Let's suppose we have a file vzdump-qemu-158-2016_01_29-04_00_10.vma.gz, the first step is to gunzip it.
# gunzip vzdump-qemu-158-2016_01_29-04_00_10.vma.gz
After this operation we are going to have a vzdump-qemu-158-2016_01_29-04_00_10.vma, this is a vma container with our VM.
You may extract the information from here to see the contents, or, you may just deploy it to a working Proxmox host. Let's see what's inside:
# vma extract vzdump-qemu-158-2016_01_29-04_00_10.vma -v data/
This command will extract the vma file into the data directory located at the same level. Actually, it will take some time to do it, be patient.
After the command completes you will end up with two files:
qemu-server.conf. This is the configuration of the VM.disk-drive-scsi0.raw. This is the raw contents of the disk. You may mount it to see the files.
Case: Restoring differential backup
For restoring a differential backup we need one more additional step. Precisely we need first to merge vcdiff file, and then, perform the steps from the previous case.
For this task, we will need pve-xdelta3 tool.
pve-xdelta3 tool is a slightly modified by ayufan version of xdelta3 tool. You may read more about it here,
also, you can download a deb package from here or compile from the source code.
For me the build process went smoothly on my Debian machine. I just downloaded a tarball, unpacked it and after executing
./configure, make, sudo make install I had xdelta3 installed on my machine. For some reason the tool compiled from tarball is named xdelta3, while the tool installed with Proxmox plugin is named pve-xdelta3, for us it does not make any difference.
Let's say we have the following files: vzdump-qemu-158-2016_01_29-04_00_10.vma.gz and vzdump-qemu-158-2016_01_29-04_00_10.vma.gz--differential-2016_01_31-04_00_07.vcdiff.
For merging them, we need to execute the following command:
$ pve-xdelta3 -q -d -R -s vzdump-qemu-158-2016_01_29-04_00_10.vma.gz \
  vzdump-qemu-158-2016_01_29-04_00_10.vma.gz--differential-2016_01_31-04_00_07.vcdiff \
  vzdump-qemu-158-2016_01_31-04_00_10.vma
When the command ends, you will have vzdump-qemu-158-2016_01_31-04_00_10.vma which is your full backup on that date,
you may go to the previous step to recover the information. Please note, that xdelta3 already gunzipped the file.
Mount the raw file
In case you would like to mount the raw file you may use the following approach:
- Calculate the offset.
- Mount the image as loop filesystem.
Calculating the offset is straightforward.
# fdisk -l disk-drive-scsi0.raw
Disk disk-drive-scsi0.raw: 50 GiB, 53687091200 bytes, 104857600 sectors
Units: sectors of 1 * 512 = 512 bytes
Sector size (logical/physical): 512 bytes / 512 bytes
I/O size (minimum/optimal): 512 bytes / 512 bytes
Disklabel type: dos
Disk identifier: 0x2b23f370

Device                Boot Start       End   Sectors Size Id Type
disk-drive-scsi0.raw1 *     2048 104857599 104855552  50G 83 Linux
With this command, you may see the sector size (line 3), which is 512 bytes. And you may see where the FS starts (line 10), which is on the sector 2048. So, to calculate the offset you need to multiply 512b x 2048 = 1048576. This is where you FS starts. After getting this information you may mount:
# mount -o ro,loop,offset=1048576 disk-drive-scsi0.raw /tmp/fs